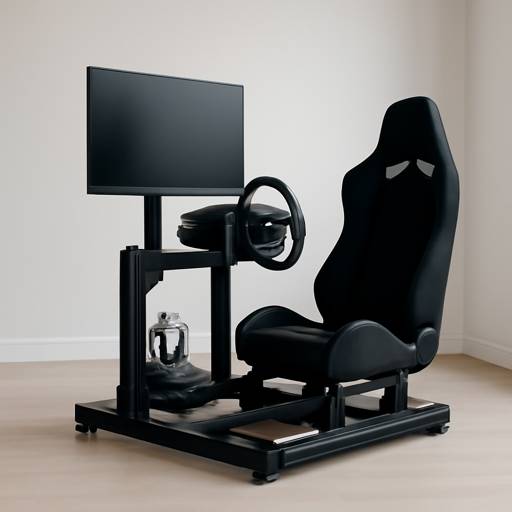
Every millisecond counts when you’re chasing a lap time. The fastest way to find pace isn’t just a high-end wheelbase or the latest pedals—it’s a rock-solid cockpit that turns force into fidelity. A purpose-built frame that won’t twist under load lets your direct drive system speak clearly, lap after lap. That’s where SIMGASM shines: hardware engineered to stay stable under pressure, so you can focus on rhythm, reference points, and racecraft instead of hardware hiccups.
Whether you’re upgrading from a belt-drive wheel or starting fresh with high torque, a customizable sim racing rig puts you in control of performance, comfort, and style. Dial in your driving position, select mounts that fit your peripherals, and scale from a compact single-screen setup to a triple-monitor powerhouse. Most importantly, eliminate flex in the places that matter—wheel base, pedal deck, and seat—so your inputs translate into consistent feedback. Use the guide below to build your own rig with confidence, grounded in proven design principles and SIMGASM’s commitment to unwavering rigidity.
Why Rigidity Wins: The Foundation of a High-Torque Sim
High-torque direct drive wheelbases amplify every design choice in your cockpit. When the frame flexes, the signal your hands receive gets blurred. Micro-movements in the wheel column smear out kerb detail; a soft pedal deck changes your brake pressure; a seat that rocks on its rails forces your core to compensate, causing fatigue and inconsistency. The solution is a platform purpose-built to resist torsion and bending at all critical junctions. That means robust wheel uprights, reinforced pedal plates, triangulated bracing where possible, and tight-tolerance connections that don’t creep over time.
Look closely at the three load paths that shape feel and lap time. First, the wheel mount: under a quick left-right transition, any flex introduces lag between what the motor commands and what you perceive. A stiff wheel column preserves the immediacy of countersteer and the fine texture that helps you sense micro-slips at the limit. Second, the pedal deck: under heavy braking, a compliant plate or long lever arm changes the geometry, robbing you of repeatability. Braking is rhythm; you need the same platform deflection every time to train muscle memory, especially with load cell or hydraulic pedals. Third, the seat and rails: even minor movement in the backrest or sliders alters your hip angle and leverage, shifting how you modulate brake and throttle mid-corner.
Stability also influences comfort and long-run pace. Excess vibration or resonance makes you chase phantom cues. A rigid rig damps those artifacts, so only the meaningful forces remain. That consistency lets you tune your FFB at lower overall strength while keeping detail, reducing fatigue across endurance stints. And when your cockpit doesn’t wander under 20–25 Nm, setup changes in the sim—like differential preload or ARBs—come through as reliable differences, not hardware noise. In short, rigidity is a performance mod: it preserves dynamic range, clarity, and confidence, making each lap a better lesson than the last.
A Step-by-Step Blueprint to Build Your Own Rig
Start by defining your torque target and peripherals. If you’re running mid-to-high torque, prioritize a rigid cockpit that accepts your wheelbase pattern out of the box and has room for future upgrades. Confirm mounting options for your pedals (including heel rest and angle adjustments), shifter, and handbrake. Choose a seat—bucket for track feel or recliner for endurance comfort—then ensure compatible side or bottom mounts. Map your trajectory: single ultrawide now, triple monitors later? Planning ahead keeps your build modular and cost-effective.
Next, lock in ergonomics. Use a simple checklist: wheel height at or slightly below shoulder level; elbow angle around 90–120 degrees; pedals aligned with your hips; brake face angled so your ankle stays neutral at peak force. Keep the seat-to-pedal distance consistent by marking rails once you’ve found your sweet spot. For shifter and handbrake, mount within a natural arm sweep—too far forward or high creates strain and accidental inputs. A stable keyboard tray, button box position, and reachable emergency stop round out the cockpit’s user experience.
Then, focus on assembly best practices. Square the frame on a flat surface before tightening. Preload connections evenly and return to critical fasteners after a shakedown session—early micro-settling is normal. Route cables with slack near moving joints, add grommets where lines cross edges, and isolate the PC from pedal stomp vibrations. If you’re on hard floors, consider isolation feet to reduce noise transmission and protect hardware. Finally, validate with a stress test: high-torque oscillation checks for play at the wheel; maximum brake pressure verifies pedal deck stiffness; quick left-right inputs expose seat or monitor wobble.
When you’re ready to configure, explore components and layout ideas, then Build your own rig with SIMGASM. The goal is a customizable, future-proof cockpit that scales from practice sessions to league racing without introducing new flex points. As you add power or peripherals, your platform should remain the constant—the stable canvas that lets upgraded hardware (and your skills) paint with finer detail.
Tuning, Upgrades, and Real-World Scenarios
With the frame sorted, unlock performance through smart tuning. Begin with force feedback basics: set motor strength to a level you can sustain for an hour without fatigue. Too high and you’ll mask detail; too low and you’ll lose grip cues. Calibrate damping, friction, and inertia to control oscillation without dulling road feel. The aim is linear, predictable resistance that communicates surface texture, weight transfer, and slip angle without surprise spikes. On pedals, start with a brake force you can repeatedly hit—often 60–80% of your upper limit—then shape the curve with elastomers or hydraulics so threshold braking is clear and repeatable. Map throttle travel to give control in traction-limited exits and ensure deadzones are minimal but safe.
Consider three common upgrade paths. Scenario one: moving from belt drive to direct drive. A SIMGASM-grade cockpit minimizes the shock of increased torque, preserving steering technique and guarding against bad habits that stems from chassis flex. Scenario two: chasing consistency in endurance events. Add a more supportive seat, stiffer heel plate, and subtle paddle extensions to reduce strain. The rigid platform you started with will make these tweaks show up immediately in lap-to-lap standard deviation. Scenario three: limited space. Opt for a compact footprint with integrated monitor mount and fold-away peripherals. Rigidity still reigns—shorter spans can be stiffer if properly braced—so you don’t have to compromise force clarity in apartments or shared rooms.
A practical example illustrates the payoff. A hobbyist running 12–15 Nm notices mid-corner corrections feel vague and braking varies by a few tenths. Inspection reveals slight wheel column twist and pedal plate flex under load. After upgrading to a stiff cockpit and re-torquing critical joints, FFB becomes more intelligible: kerbs present as crisp, repeatable pulses; oversteer onset is earlier and easier to catch; brake traces in telemetry tighten, reflecting better pressure consistency. Laptimes improve modestly, but the real win is stability—fewer unforced errors and cleaner racecraft under pressure.
Keep iterating with data. Use ghost laps to validate seating tweaks. If your wrists tire, lower overall motor strength and add a touch of damping; if micro detail feels muted, reduce filters and check for any new play in the mount. As you add peripherals—shifter, handbrake, wind or tactile feedback—mount them to solid attachment points so each signal stays isolated and legible. The philosophy is simple: start with a stable, no-flex foundation, make small, deliberate changes, and let consistency build skill. A cockpit that holds steady under torque turns setup notes into speed—because every adjustment actually means what it says.
Galway quant analyst converting an old London barge into a floating studio. Dáire writes on DeFi risk models, Celtic jazz fusion, and zero-waste DIY projects. He live-loops fiddle riffs over lo-fi beats while coding.